Setting up the database (if you have an existing database you may skip this step)
I will not be covering how to create databases within MySQL.
Either using the command line, MySQL Administrator or an interface tool such as phpMyAdmin
create a new database named Adept. (SQL: CREATE DATABASE adept;)

Once done, you need to create a user and assign the right privileges.
The easiest way to do this is to use the MySQL Administrator client.
You need to create a user. Then you need to assign all SQL operators to that user.
Set the permitted operations per hour.
Suggested setting is quite high (e.g. 10,000 operations per hour)
Lastly be sure to remember the user password.
Next we will set up the ACS4 folder locations and files.
Extract the ACS4 zip file to a simple location eg. C:\ACS4
You should see the following set of files (excluding the documentation):
- ACS3toACS4convert_4_0_18.zip
- admin-conf.txt
- admin.war
- fulfillment.war
- fulfilment-conf.txt
- operatorClient.jar
- packaging-conf.txt
- packaging.war
- sample_books.zip
- sample_store-20080908.zip
- UploadTest-1_1.jar
- UploadTest-1_1.zip
(C:\Program Files\Apache Software Foundation\Tomcat 6.0\webapps)
- admin.war
- fulfillment.war
- packaging.war
Setting up signed URL certificates
With OpenSSL installed, you need to create some URL certificate files.
Here are the steps with some elaboration:
The License Signing service (hosted by Adobe) needs a certificate signing request in format. The following command line uses OpenSSL to create an PKCS10 RSA Keypair and a CSR in PKCS10 format:
openssl req -newkey rsa:1024 -out operator.pkcs10 -keyout operator.key
You then need to answer questions on the command line
It doesn't really matter what you enter as those values will be overwritten in the certificate creation process on the License Signing server.
You will also be prompted to enter a password (and then confirm it).
Be sure to remember this password!
You should see something similar to this appear as you answer one line at a time:
- Country Name (2 letter code) [AU]: US
- State or Province Name (full name) [Some-State]: California
- Locality Name (eg, city) []: San Jose
- Organization Name (eg, company) [Internet Widgets Pty Ltd]: Adobe
- Organizational Unit Name (eg, section) []: Digital Publishing
- Common Name (eg, YOUR name) []: Ric Wright
- Email Address []: contentserver_support@adobe.com
DONT answer them. They are not needed, and in some cases can cause a crash.
- Please enter the following 'extra' attributes to be sent with your certificate request.
- A challenge password []:
- An optional company name []:
The result of this is the file operator.pkcs10, which will contain the certificate request (to be uploaded to Adobe) and the file operator.key, which will contain the password-protected private key.
Next, you need to upload those files to Adobe using the operatorClient.
In C:\ACS4\ is the zipped file containing operatorClient.jar.
Extract it from the zip file.
You can start the operatorClient by double-clicking.
You can also open a DOS prompt window, navigate to that folder and enter:
java -Xmx1024M –jar operatorClient.jar
if this returns an error, try a lower Ram setting such as:
java -Xmx512M –jar operatorClient.jar
 The authentication URL should be http://adeactivate.adobe.com/adept.
This is the default, but verify that it is correct.
The License Signing URL should be https://nasigningservice.adobe.com/licenseadmin if you are fulfilling books from North America.
Otherwise, you should change it to https://eusigningservice.adobe.com/licenseadmin
Note that in either case the URL must be https.
Login using the Adobe ID sent to you by Adobe.
It will be of the form acs4operator@yourdomain.com.
The password will be some variant of ChangeMe.
You can and should change that password by navigating to here
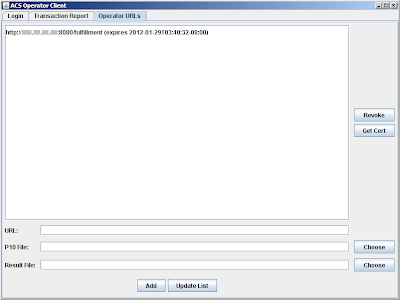
Now you need to add the fulfillment URL for your server.
Go to the Operator URLs tab.
Enter the URL that you will be using for your fulfillment server.
 If the port you are using is 80 for HTTP (or 443 for HTTPS), you may omit the port.
But if you are using a different port, the value of the port must be specified as well,
e.g. http://mydomain.com:8080/
The URL must include the full path to the fulfillment service
e.g. http://mydomain.com:8080/fulfillment and not http://mydomain.com/
Once you have entered the correct fulfillment URL, press the Choose button and navigate to the pkscs10 file you created using OpenSSL.
The Result File will be automatically entered for you.
When you are sure it is correct, press Add.
This will make a call to the Adobe servers, which will create and download the operator.cer file. This will take a few seconds.
The LicenseSigning service returns the certificate in DER format.
OpenSSL p12 packaging requires the certificate to be in PEM format.
To convert from DER to PEM use the following OpenSSL command line:
openssl x509 -in operator.cer -inform DER -out operator.pem -outform PEM
Assuming you named the output file operator.pem, run this command to package the certificate and the key together next:
openssl pkcs12 -export -in operator.pem -inkey operator.key -name operator –out operator.p12
The result of this should be the file operator.p12
Verify that it is in the folder.
It is important to note that the parameter –name operator specifies, as implied, the name of the operator (being the operator of ACS4).
So when you set up your fulfillment configuration you will need to specify the location of the operator.p12 file, the name of the operator of that file and the password.
So the name can be any one you like.
In the above example the name is operator, but it could also be acs4operator@domain.com
So long as it matches your fulfillment.conf file all will be well.
Which brings us to our next step in the setup process.
To continue click here
No comments:
Post a Comment