I make no excuses that i borrowed a lot of content from the original Adobe Content Server 4 Technical Reference Manuals and other Documentation while adding in my personal notes, screen shots, and potential pitfalls to look out for.
Read through everything you can before beginning the setup process, understanding the concept of Adobe Content Server as a whole is as important as getting everything running smoothly.
Please refer to, study, and read the original ACS4 installation and quick start documentation here.
The ACS4 installation can be split into steps:
- Installing the basic requirements
- Setting up the Admin console
- Setting up the Fulfillment service
- Setting up the Packaging service
- Generating the Certificate files
- Completing Config Files
- Content Server Status Checks
- Book Packaging and Distribution
- Serving the Sample Store
Basic requirements to run Adobe Content Server:
- The Java Runtime Environment (JRE)
- Apache Tomcat version 6 or higher
- MySQL version 5 or higher.
In addition, to run an online store, you will also need:
- Apache HTTP Server
- PHP 5 or above.
Install the Java Runtime Environment (JRE) first as Apache Tomcat will need to know the install path of the JRE when we set it up.
The JRE can be obtained here.
Next install the Apache HTTP Server, and PHP
By default Apache HTTP Server will run on port 80.
(not required if you dont intend to run a store from the server)
Apache HTTP Server can be obtained here.
PHP can be obtained here.
After this install MySQL, it can be obtained here.
Next install Apache Tomcat
Apache Tomcat can be obtained here.
The Tomcat setup will look for the JRE, and should find the install path automatically.
(If not, then specify where you installed the JRE)
The default port will be set to 8080, seeing as Apache HTTP is already running on port 80.
Tomcat will prompt for an admin password, enter one and remember what it is.
The default installation does not ask you about memory allocations.
Bring up the Tomcat configuration tool after it is installed.
Navigate to the Java tab and set the initial memory size to 256 and the maximum memory size to 1600 (the max allowed on 32bit Windows systems) or the maximum RAM capacity on your server.
This is enough to package most any size ebook.
Important
Something omitted from the original documentation is that Tomcat will require Connector/J to succesfully link to MySQL via the JDBC driver to Tomcat.
The MySQL JDBC driver can be obtained here.
(Read the included documentation on setting up Connector/J using Tomcat)
Once unpacked, the included .jar file needs to be placed into the Tomcat install path under the \lib\ directory. Restart Tomcat to ensure the new .jar is loaded up.
The next installation is OpenSSL which appears much later in the adobe documentation, and we will avoid some confusion by setting it up now, before we continue with configuration later.
The easiest way to obtain OpenSSL for Windows is through Cygwin (a UNIX emulator).
Get Cygwin here.
Run setup.exe and when prompted select Install from Internet.
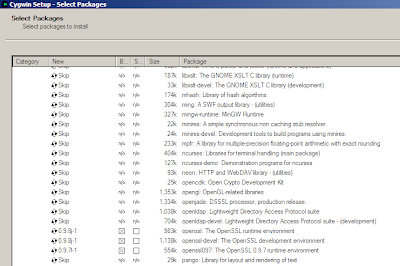
Follow all the setup steps, select a mirror to download a list of available Cygwin library files, and soon you should be presented with a tree view of different packages.
Expand the Libs section of the tree, find the OpenSSL packages, and left click the arrows in the columns until the text changes from skip to a version number next to each.

Proceed with the installation, and it will download OpenSSL.
Once the download is done, exit the installer.
To run Cygwin commands from the Windows command line, instead of the Cygwin shell, include the full path to the Cygwin \bin\ folder into the windows PATH variable.
If you are having trouble installing OpenSSL some detailed instructions on installing OpenSSL can be found here.
The basic requirements are now set up.
To continue click here.
Video ?
ReplyDelete